
Biology
Biology Lab: AP Investigation #6 - Cellular Respiration

Lab Exercise
Biology Lab: Fermentation and Respiration
Concept: Cells consume energy through respiration and fermentation processes, which also produce waste products. Measuring the rate of production of these products can be used to indicate the rate of the respiration reaction.
Goal: To measure or observe the effects of environment changes (temperature, acidity, or other factors) on the rate of respiration in subject organism.
AP Exam preparation -- Doing the AP version of this lab:
Please read through the AP Laboratory Manual, Laboratory #6, Cellular Respiration. If you have access to the equipment and materials used in the lab, please perform the lab as indicated in the Manual. If not, you may use the alternate lab below. Complete the Lab Manual worksheets and submit your data to the Moodle Biology Website for comparison with the work of your fellow students.
As an alternative to the AP lab, you may perform the following lab, based on Lab Topic #6: Cellular Respiration, from Jean Dickey's manual, Laboratory Investigations for Biology. Instead of measuring oxygen absorption, we will measure carbon dioxide production from fermentation. However, since you should be familiar with the AP Lab as designed, please review that investigation in your lab book.
Alternative Experiment to AP Investigation #6
Goal (alternate lab): To determine how sugar availability affects production of CO2 in yeast by collecting CO2 gas released in the fermentation process.
Materials
Refer to the setup diagram for help understanding what materials you will need.
- Three large jars or beakers.
- Six test tubes.
Alternatives: small narrow jars (bottles used to hold spices or crafts supplies like beads or glitter, cocktail olives or cherries -- save the lids!). - Three lengths of flexible tubing that can pass through holes in the rubber stoppers of one of the test tubes and into the second tube; it must be long enough to allow you to set up the tubes as shown below.
Sources: science supplies, aquarium supplies, hardware and garden shops. - Three rubber one-hole stoppers; push one end of a piece of tubing tubing through the hole in the stopper.
Alternative: if using jars, punch a hole in each of three lids, push the tubing through the hole, and caulk the junction with plumber's putty so that nothing leaks out around the tubing. - Thermometer capable of measuring °C in .1 or .5 increments.
- Wax pencil or labels for beakers.
- Corn syrup.
- Yeast.
- Distilled water.
- Tap water for the water bath.
Procedure:
SET UP THE FOLLOWING APPARATUS FIRST!
- Fill the water bath with HOT water (50-60 °C) and submerse the tubing and one test tube (your collection tube) as shown in #1 below. Note that the stopper does not go in this test tube!
- Submerse one of the beakers and upend the full test tube in the beaker, keeping the flexible tubing inserted inside the test tube as shown in #2 below. The tubing should remain full of hot water as well.
- Lift the beaker, tube, and tubing out of the water bath and drain some of the water from the beaker as in #3 below, but not enough to go below the open end of the test tube. Be sure there are no kinks or large bubbles of air in the tubing that would block the flow of gas through it and into the upended test tube.
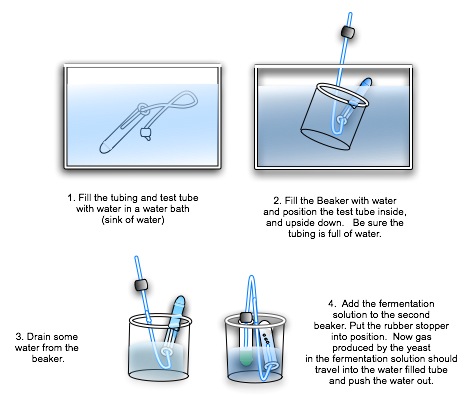
- Repeat the above procedure two more times: you need three complete setups. Work quickly so that the water doesn't cool off much.
Fermentation solution
- Prepare the yeast suspension by adding 3 packets or tablespoons of yeast to 500ml (1/2 L or about 2 cups of warm water at around 43 °C (110 °F). Let the yeast mixture "proof" -- it should become bubbly. It should also cool a bit -- 35 °C is the temperature at which yeast multiplies best.
- Prepare the three empty test tubes as shown below. Why is there no yeast in the first test tube?
Tube Minutes 0 5 10 15 20 25 30 1 (3mL corn syrup) 2 (3mL corn syrup +
1 mL yeast suspension)3 (3mL corn syrup +
3 mL yeast suspension)
- Swirl the test tube gently to mix the ingredients, and place them in the beakers. Put the rubbers topper in the fermentation tube. Your setups should look like #4 above.
- Wait one minute for any gas resulting from assembling the apparatus to clear the fermentation tube and tubing, then make a baseline mark at the current the water level on each collection tube.
Data Collection and Analysis:
- What hypothesis could you make from the setup above?
- Create a table as shown below and measure the distance from your baseline mark to the current water level along the collection test tube. Take data for up to 30 minutes at 5 minute intervals.
Include your data in your lab report.
Lab report
Note any changes you made to the suggested materials and procedures, why you made them, and what likely effects they had on the accuracy of your measurements and the outcome of your experimental runs. Identify your hypothesis, show your data, and explain whether your data supports or contradicts your hypothesis.
© 2005 - 2026 This course is offered through Scholars Online, a non-profit organization supporting classical Christian education through online courses. Permission to copy course content (lessons and labs) for personal study is granted to students currently or formerly enrolled in the course through Scholars Online. Reproduction for any other purpose, without the express written consent of the author, is prohibited.